¶ The Interface
¶ Basics
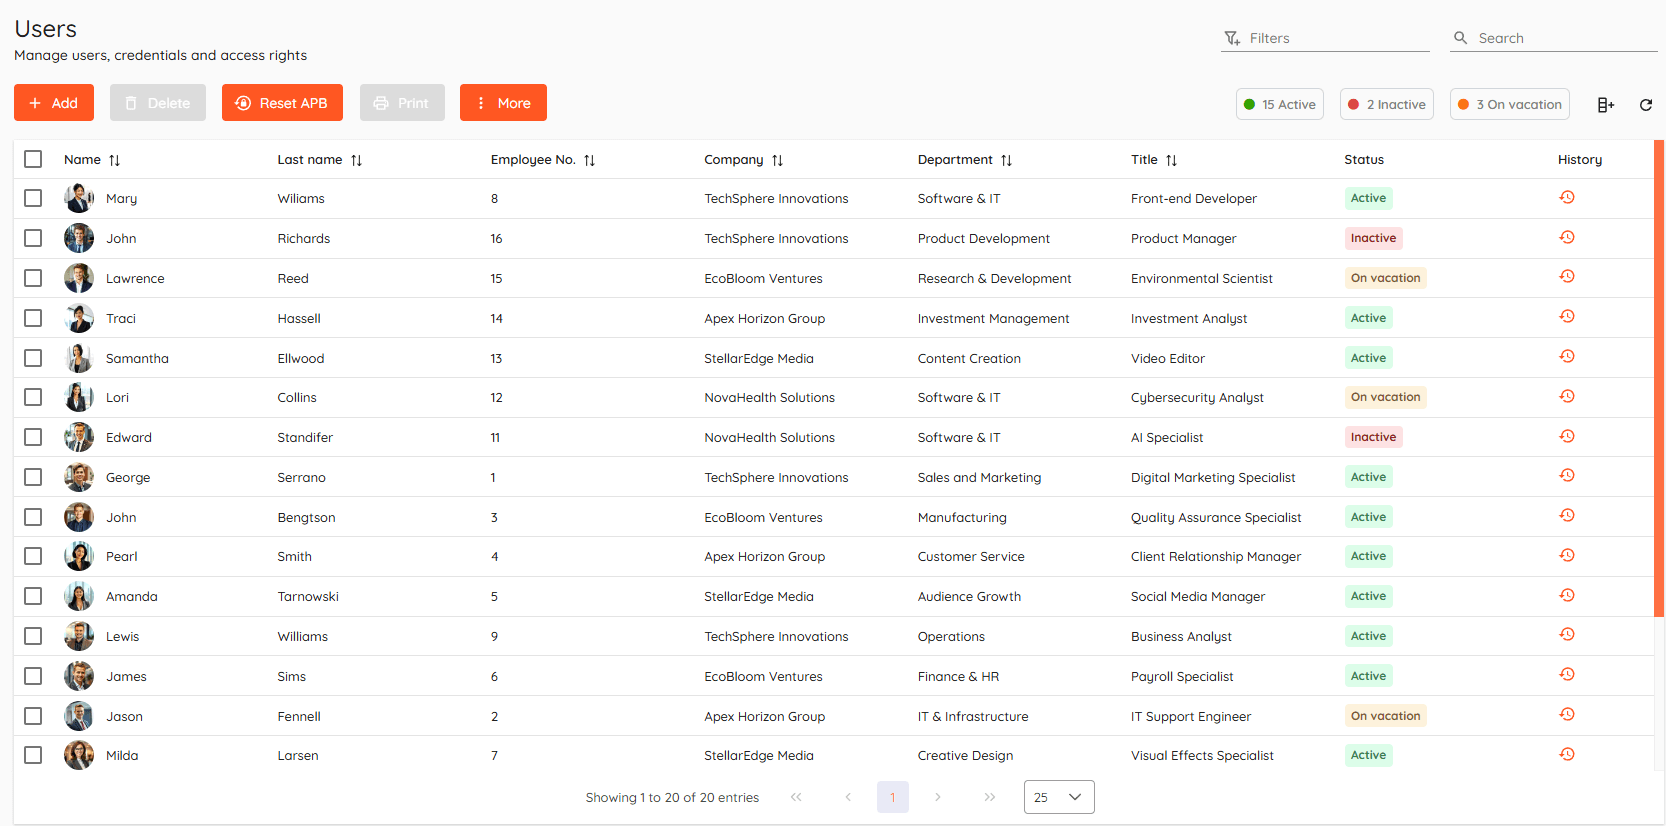
In this section you can manage users, their credentials and access rights. Every user will be shown here.

- Add - Create new user.
- Delete - Remove selected user.
- Reset APB - Select single or multiple users and reset their current APB state.
- Print - Generate User Report.
- More - Additional options. (Import/Export).
- Import - Import users from CSV or Active Directory source.
- Export - Export user list to CSV or PDF list.
¶ Filters and search
Top right corner contains two fields called Filters and Search.
In the Search field you can quickly filter users by typing string and it will show every user that contains it.

Filters can be created by clicking  .
.
Filters allow you to create your own custom view where you can select what you want to see exactly.
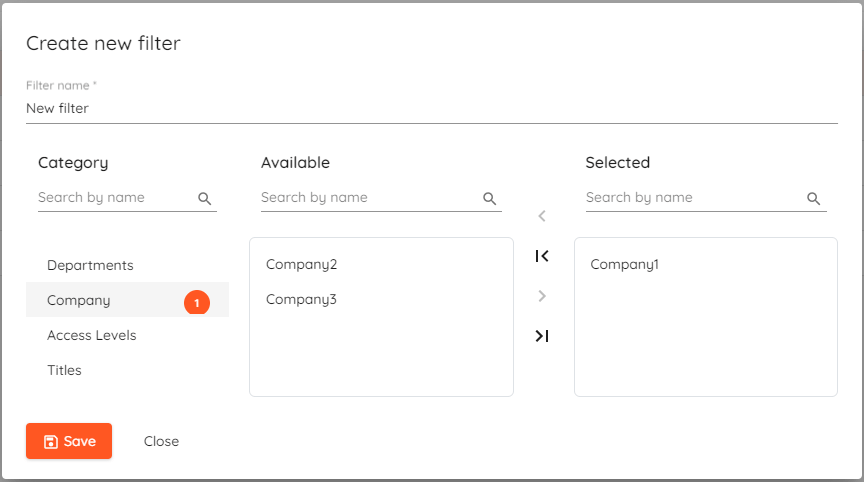
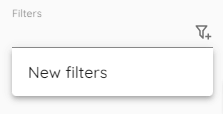
You can create as many filters as you like and then apply them by clicking on the Filters field and selecting the one you need.
¶ User status
Users can also be filtered by their status by clicking on any of the status buttons.

¶ Add a new user
To add a new user, click on the Add button, which will open the user configuration menu on the right side of the screen.
¶ User related settings
¶ Main
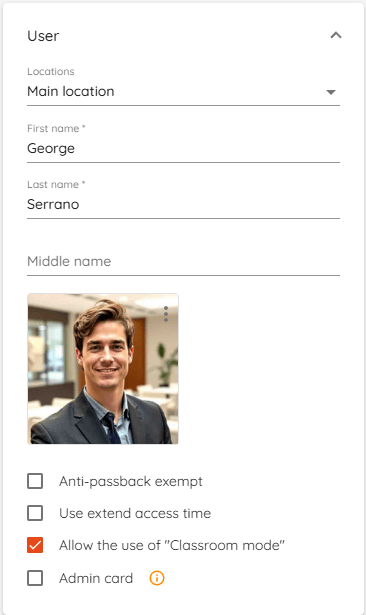
- First name - Enter first name for the user. This is a required field.
- Last name - Enter last name for the user. This is a required field.
- Middle name - Enter middle name for the user.
- Location - Select the location to which the user belongs. It can be single location or multiple. This option will be shown only if there are more than single location.
- Profile picture - You can add profile picture for the user. It will be seen in the
eventswindows in events where user is involved such as access granted. - Anti-passback exempt - This user will be exempted from anti-passback areas.
- Use extended access time - This user will use extended access time that is set door settings.
- Allow the use of "Classroom mode" - This user will be allowed to use "Restricted "Classroom" mode".
- Admin card - Allows user to go through locked doors.
Extended access functionality is currently only supported with HID Aero and Mercury devices, partially with HID VertX (only extended strike time).
¶ Contacts
These fields are informational and optional.
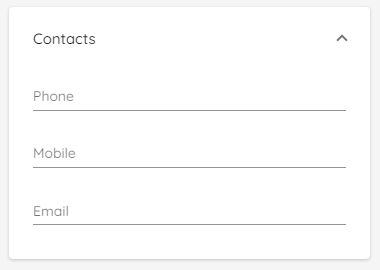
- Phone - enter phone number for the user.
- Mobile - enter second phone number for the user.
- Email - enter e-mail address for the user.
E-mail is required if you want to use Notifications, to issue a Mobile ID or a QR Code.
¶ Employee
To add company, department or title just enter desired name in the corresponding field and click "+" icon. Later, you can type and search for already existing entry.
Following fields are non-mandatory but it's recommended to fill them as they can be used later on when filtering users or creating reports.
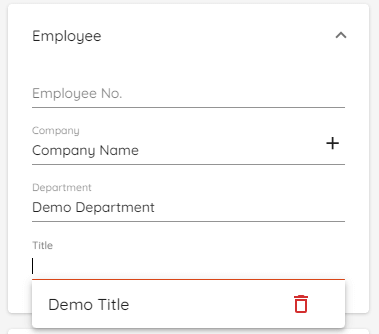
- Employee No. - Employee number. This is optional, but it's highly recommended to have unique employee number.
- Company - Company name. Can be used for filtering.
- Department - Department name. Can be used for filtering.
- Title - User title. Can be used for filtering.
¶ Validity
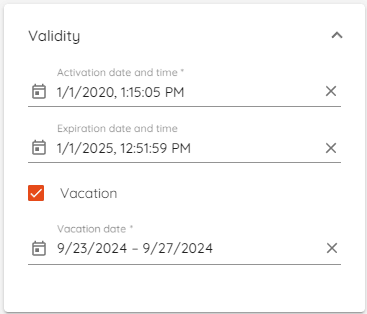
In the validity section you can set user vacation, user activation and expiration date and time.
If a user is on vacation - you can temporary disable the user by checking the "Vacation" checkbox and setting the vacation date during which the user will be deactivated.
Deactivated user will not be active and will not gain any access rights in the system.
You can create new user or select existing and set his activation date now or in the future. Also, you can set expiration date, meaning user will not have access rights in the future and also use clean-up settings to remove him from the system.
User activation/expiration and vacation works with HID Aero and Mercury devices.
¶ Additional
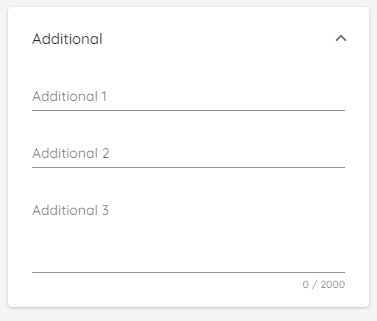
In this section you can add any additional information about user. These fields are informational and are not used anywhere except user card report.
Values entered here can be used in Search.
¶ Access levels
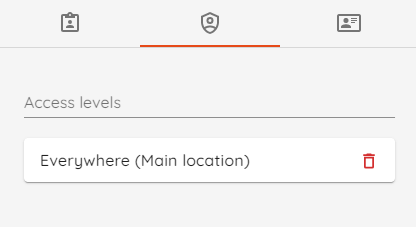
To add access level for user - click on Access levels field and select one of the options. You can have multiple access levels per user.
By default Everywhere gives access to all doors in the system.
Location of access level is shown in brackets.
HID VertX controllers support up to 8 access levels per user.
HID Aero and Mercury controllers support up to 32 access levels per user.
¶ Identifications

Identification set is a collection of credentials such as card, PIN and License plate. Each set can contain only single credential of one type.
You can have multiple identification sets per user.
To add a new identifications set click on Identifications.
¶ Card
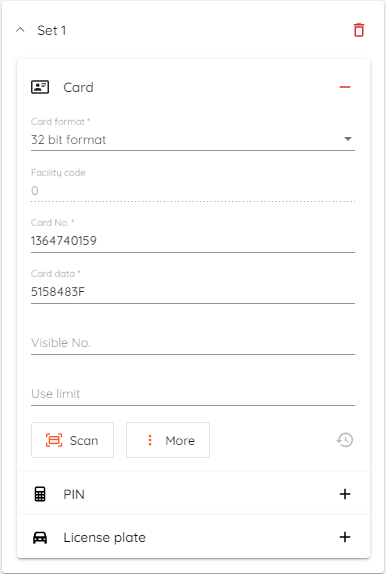
To add a card as identification click on "+" button in the corresponding field and Card panel will expand.
Make sure that the required card format is enabled in Settings.
There are a few ways to assign a card:
1. Select card format and enter card number manually (Card data will be generated automatically).
2. Click ![]() , select reader, click
, select reader, click ![]() and then scan your card with selected reader. All details should fill up.
and then scan your card with selected reader. All details should fill up.
3. Click ![]() and select
and select ![]() to get a list of cards that has been scanned but not assigned to any user. You can select any available card from that list.
to get a list of cards that has been scanned but not assigned to any user. You can select any available card from that list.
4. Click ![]() and select
and select![]() for random card details to be generated.
for random card details to be generated.
5. Click ![]() and select
and select ![]() to issue Mobile ID. More info on how to issue Mobile ID here.
to issue Mobile ID. More info on how to issue Mobile ID here.
- Use limit - Identification card usage limit on readers that have "Entry/Exit use limit" enabled in door advanced settings. Use limit can be set to reset each hour/day/week etc. using cron expression in settings.
¶ QR Code (Unique card)
For e-mail with QR code to be sent out you need to have configured e-mail provider in Notifications.
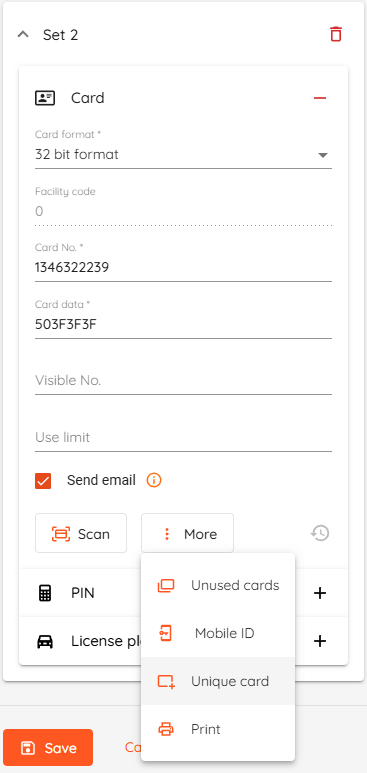
Click ![]() and select
and select![]() for random card details to be generated. "Send email" checkmark will appear if you have configured e-mail provider in Notifications.
for random card details to be generated. "Send email" checkmark will appear if you have configured e-mail provider in Notifications.
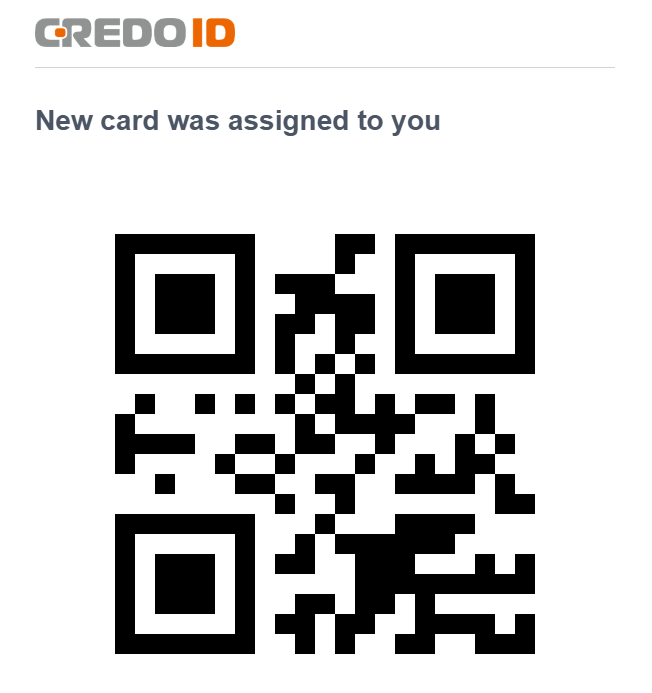
Upon clicking "Save", an email with QR Code will be sent to the address specified in the user's contacts.
To print a card with selected user's details using one of card designer templates - click ![]() and select
and select ![]() . You will be presented with "Card Print" pop-up where you can select one of created templates from card designer.
. You will be presented with "Card Print" pop-up where you can select one of created templates from card designer.

After selecting a template click "Print" button at the bottom left corner of the Card Printing window. Windows print menu will open, select your printer and follow instructions.
¶ PIN & License plate
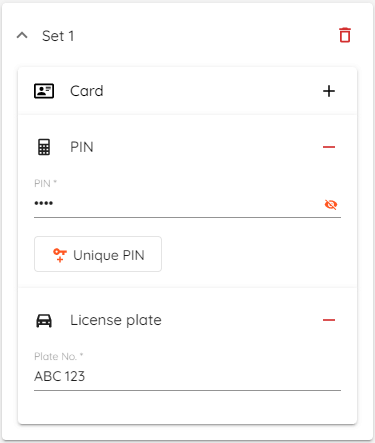
To add PIN or License plate number click "+" button in the corresponding field.
To generate Unique PIN code click ![]() . You can check users PIN by clicking
. You can check users PIN by clicking  .
.
PIN code length can be set in settings and it should be between 4 and 8 digits long. It's 4 by default.
Duplicate PIN codes can be used with HID Aero and Mercury devices while using "Card and PIN" authentication mode.
License plate can be used in systems with configured DigiFort license plate recognition module.

After updating any details click Save button for changes to be applied.
PIN only mode on Mercury and HID Aero controllers requires card added as a credential as well. To use PIN only without using real cards, use "Generate unique card" function to generate "dummy" card.
Card and PIN mode requires both card and pin details to be in the same identification set.
¶ Card history
Card history can be accessed by going to users identification menu and clicking  button which is found in "Card" section.
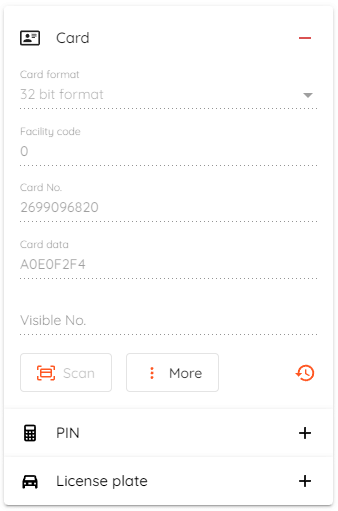
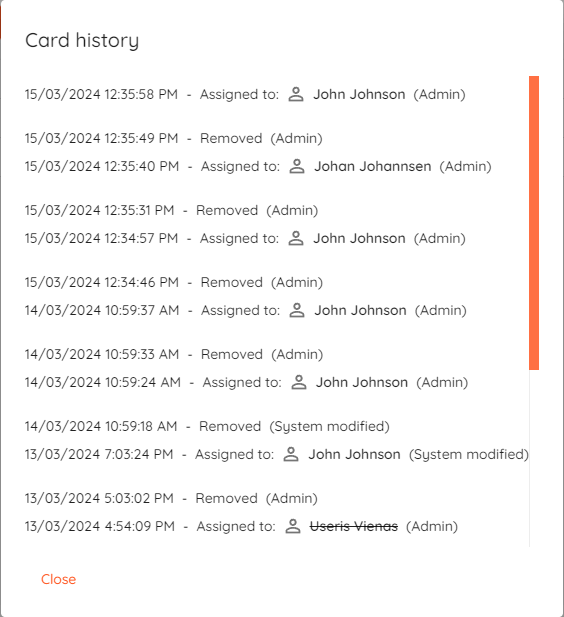
In card history view you can see who and when assigned and removed a card.
¶ User report
User report contains all information about user that has been entered into CredoID.
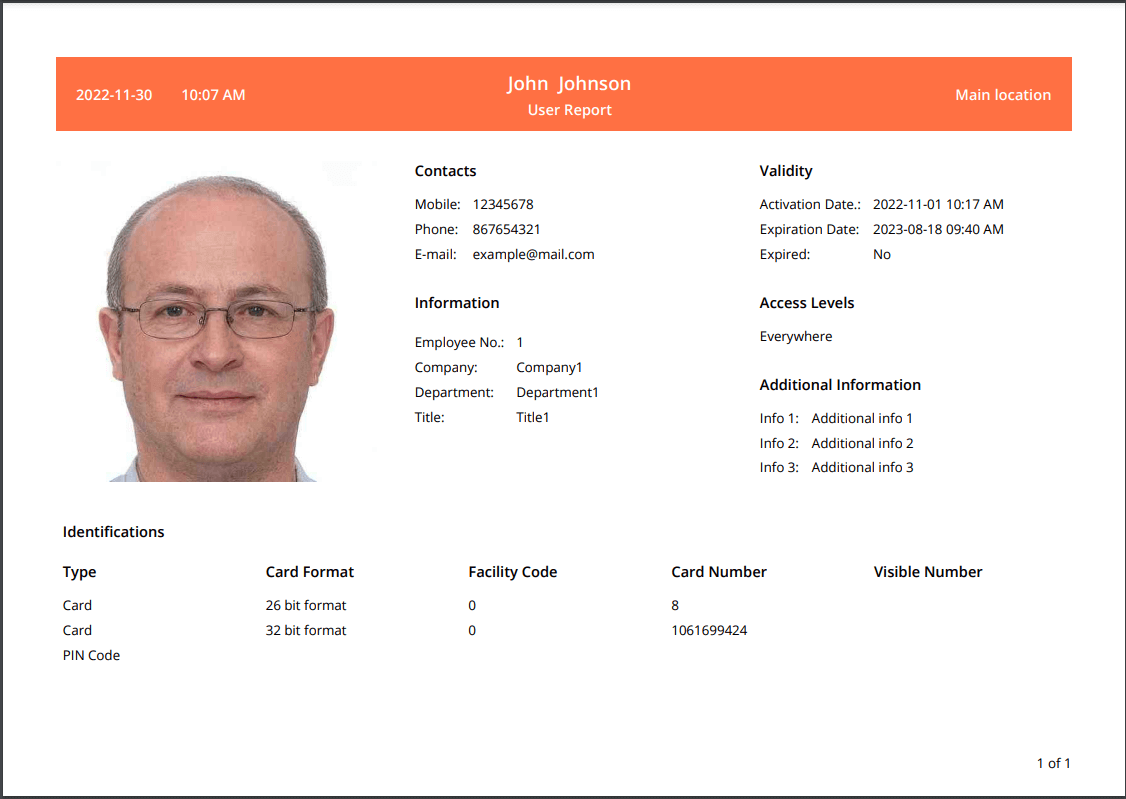
To get "User report" select any user from the list and then click ![]() . New browser tab will open with generated PDF file which then can be downloaded and/or printed.
. New browser tab will open with generated PDF file which then can be downloaded and/or printed.
¶ User access history
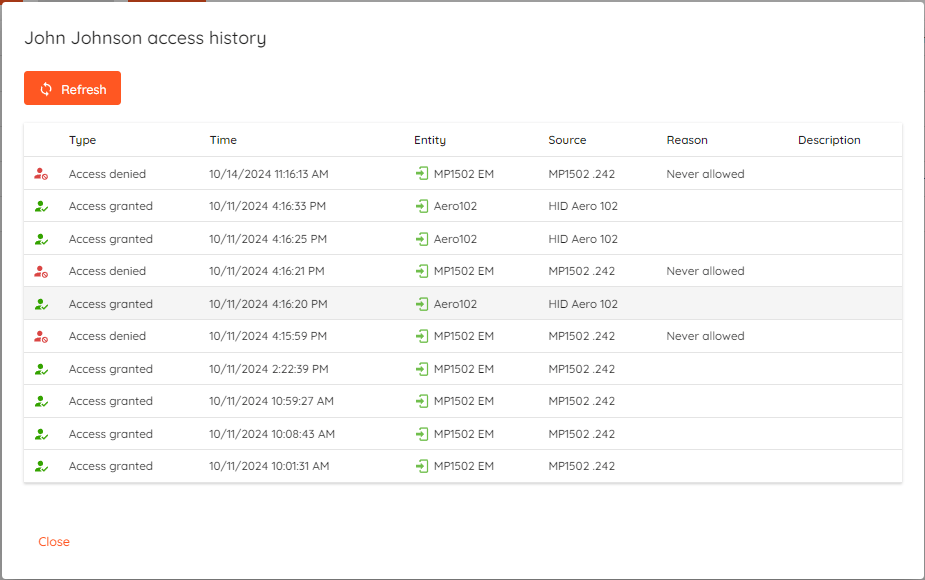
User access history shows 10 last Access grant/denied events for selected user. User access history can be opened by going to user list and clicking a button in "History" column.
¶ Bulk edits
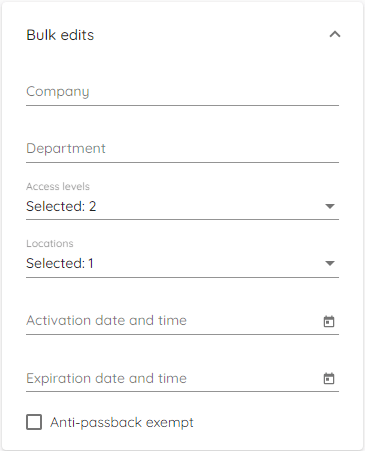
When selecting more than one user - bulk edits menu opens. Editing users in bulk allows to change certain details for all selected users at once.
Details that are available to edit in bulk:
- Company
- Department
- Access levels
- Locations
- Activation/Expiration date and time
- Anti-passback exemption
- Additional 1/2/3 fields
¶ Import
CSV and Active Directory are supported as import sources.
Import Limitations - up to 8 access levels per user and up to 16 locations per user.
¶ Active Directory
You can import users from LDAP source, mainly Active Directory. Moreover, this will let you pull groups and assign access levels for user entry permissions.
To Import users click Import and import settings window will appear.
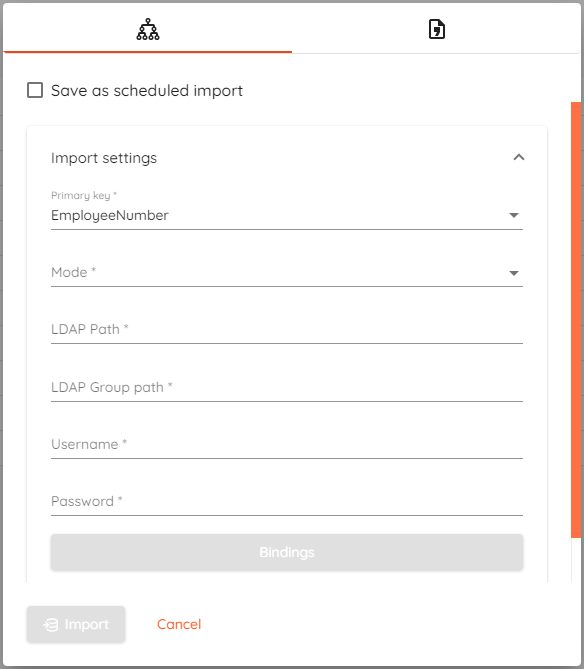
- Primary key - Required field for
primary keyused to identify unique users.First and Last nameorEmployee no.can be used. - Mode - Defines import mode. Can be one of the following:
Overwrite,AppendorSynchronize. - LDAP Path - Connection string that points to users or user group. It is used to pull users and their attributes from AD. In example:
LDAP://127.0.0.1/OU=Users,DC=company,DC=local - LDAP Group path - Connection string that points to groups. It is used to bind access level to a group members. In example:
LDAP://127.0.0.1/OU=Groups,DC=company,DC=local - Username - Username to login into Active Directory.
- Password - User password to login into Active Directory.
- Bindings - Open dialog window for users and groups attribute binding to CredoID fields.
Mode is a very important setting, proceed with caution.
| Mode | Description |
|---|---|
| Overwrite | Add new users and overwrite existing user data in CredoID. If user already exists, all data will be updated from import source. |
| Append | Add new users, update existing user details and append identifications, locations and access levels. Will not remove existing users if they are not present in the source. |
| Synchronize | Same as overwrite with exception that users are removed from CredoID if they do not exist in import source. |
Save as scheduled import can be checked to set up a scheduled import:
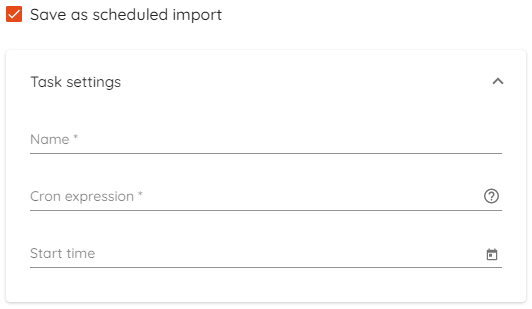
- Name - Unique name for a scheduled task.
- Cron expression - The scheduled imports uses a
quartz cron expressionto determine the frequency with which a scheduled task triggers an import job. Enter custom expression or use pre-made ones. - Start time - Determines when scheduled task is started for the first time.
A cron expression is a string comprised of 6 or 7 fields separated by white space. Fields can contain any of the allowed values, along with various combinations of the allowed special characters for that field. The fields are as follows:
| Seconds | Minutes | Hours | Day of the month | Month | Day of the week | Year |
|---|---|---|---|---|---|---|
| 0-59 | 0-59 | 0-23 | 1-31 | 1-12 or JAN-DEC | 1-7 or SUN-SAT | empty, 1970-2099 |
The fields can also contain various combinations of the allowed special characters for that field. For example, the asterisk (*) special character can be used in all fields to represent all values within the field.
For a list of the allowed special characters in each field and for example expressions, see the Quartz Scheduler documentation
¶ Bindings
After successful connection to LDAP source binding dialog will pop-up where you can bind user attributes from Active Directory to CredoID fields. Also, it allows you to bind Active Directory groups and their respective members to CredoID access levels.
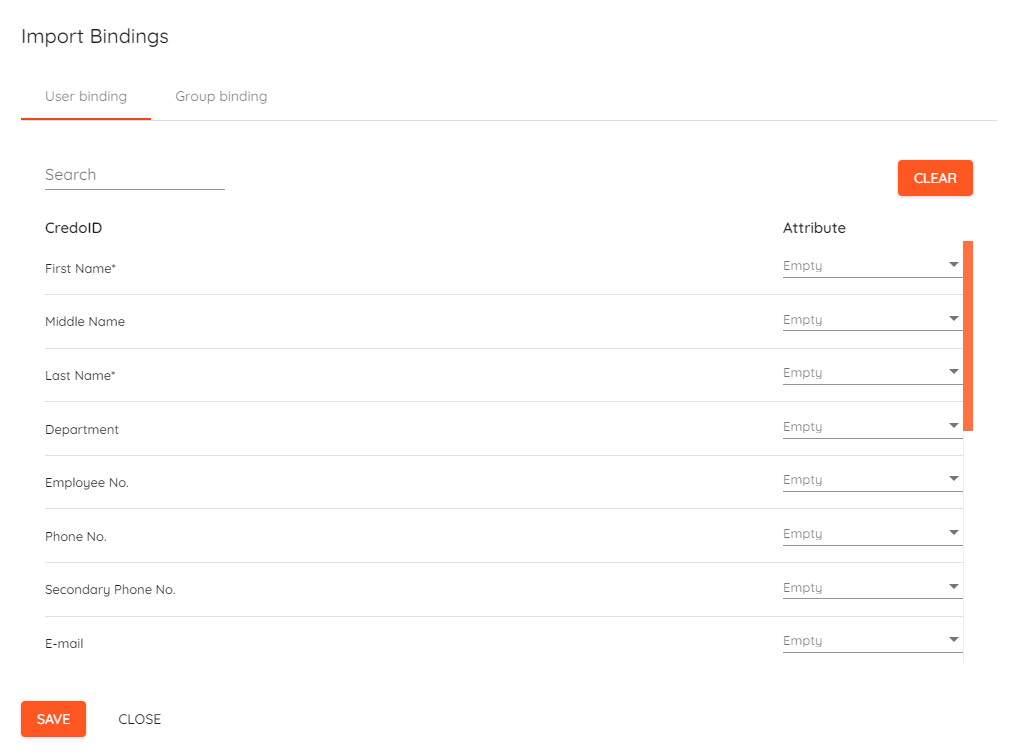
- On the left side under the
CredoIDyou can see all fields that are available to use.Searchallows you to quickly filter our necessary field. - On the right side under the
Attributeyou have a selection field which allows you to bind attribute from yoursourceto coresponding field in CredoID. Selection field has search functionality as well to quickly filter attributes fromsource. Clearlets you clear bindings and start over.
Default location "Main location" will be used if attribute field is empty.
"Activation date/Expiration date" fields have to follow ISO 8601 date and time standard.
Identification(s) field can be multi-value and must follow one of the following formats:
- JSON string
{
    "CardNumber": "12345",
    "FacilityCode": "10",
    "VisibleNumber": "12345",
    "CardFormatBits": 26,
    "PinCode": "1234",
    "LicensePlate": "MDP123"
}
- Unicode string
cardbits_facilitycode_cardnumber_pin
26_10_12345_1234 as an example. If you are not using PIN code the value can be 0.
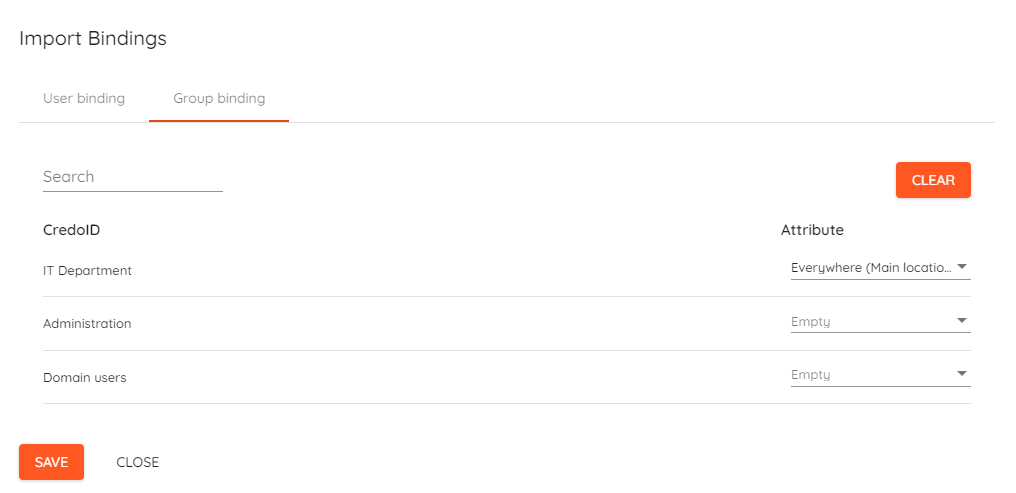
- On the left side under the
CredoIDyou can see all the groups from Active Directory that are available to use.Searchallows you to quickly filter our necessary field. - On the right side under the
Attributeyou have a selection field which allows you to bind access level from CredoID to coresponding group from Active Directory. Selection field has search functionality as well to quickly filter access levels from CredoID. Clearlets you clear bindings and start over.
¶ Comma Separated Values (CSV)
To Import users using csv - click Import and select CSV in the top right of pop-up window menu.
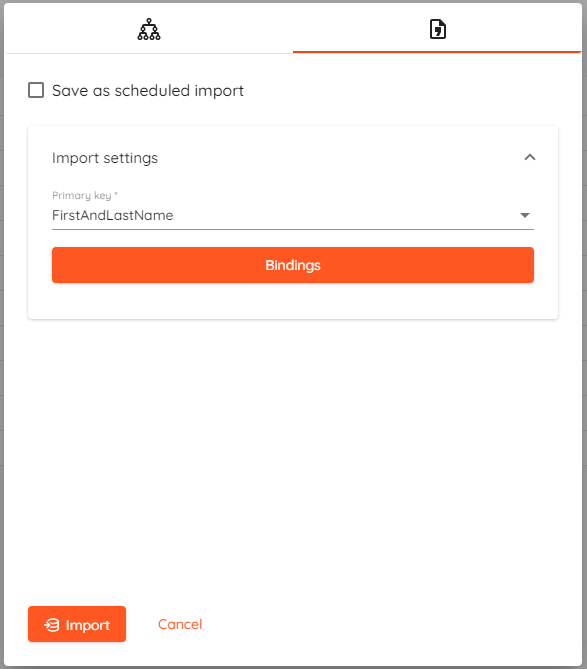
In Import settings section select Primary key. It's either “FirstAndLastName” or “EmployeeNumber”. Primary keys must have unique values.
Click Bindings → Import file, select .csv file from your computer and then click Select. Import Bindings window should open.
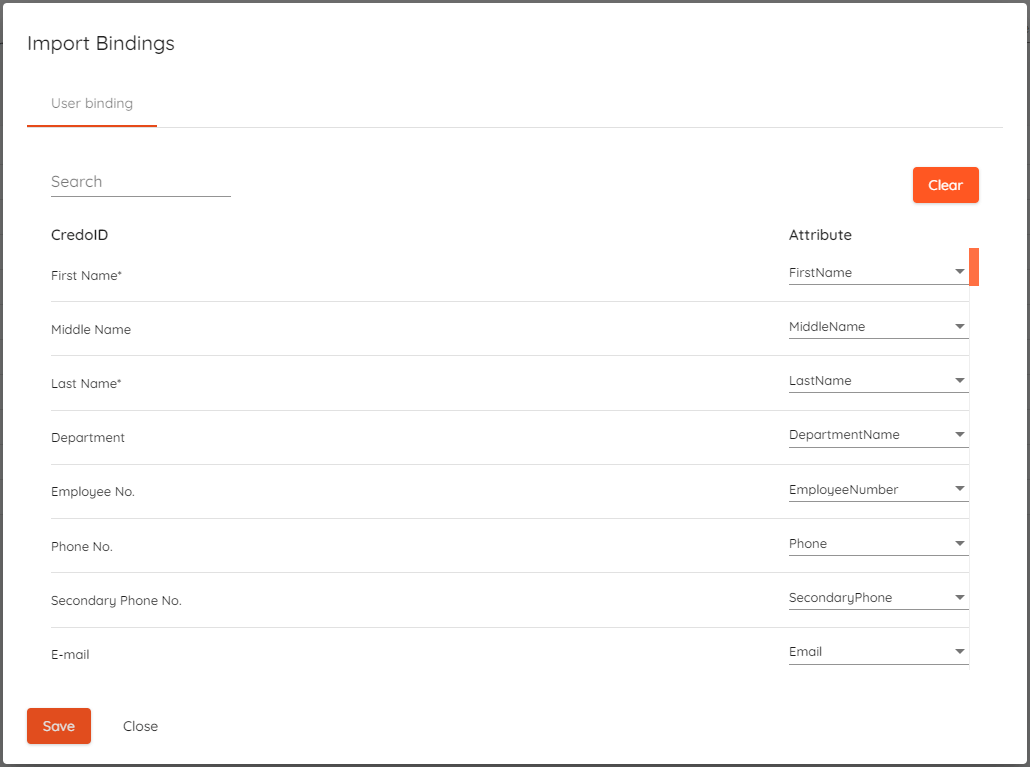
- On the left side under the CredoID you can see all fields that are available to use. Search allows you to quickly filter our necessary field.
- On the right side under the Attribute you have a selection fields which allows you to bind attributes from your source to corresponding field in CredoID. Selection field has search functionality as well to quickly filter attributes from source file.
- Clear lets you clear bindings and start over.
Default location "Main location" will be used if attribute field is empty.
"Activation date/Expiration date" fields have to follow ISO 8601 date and time standard.
Identification(s) field can be multi-value and must follow one of the following formats:
- JSON string
{
    "CardNumber": "12345",
    "FacilityCode": "10",
    "VisibleNumber": "12345",
    "CardFormatBits": 26,
    "PinCode": "1234",
    "LicensePlate": "MDP123"
}
- Unicode string
cardbits_facilitycode_cardnumber_pin
26_10_12345_1234 as an example. If you are not using PIN code the value can be 0.
Save as scheduled import can be checked to set up a scheduled import:

- Name - Unique name for a scheduled task.
- Cron expression - The scheduled imports uses a
quartz cron expressionto determine the frequency with which a scheduled task triggers an import job. Enter custom expression or use pre-made ones. - Start time - Determines when scheduled task is started for the first time.
A cron expression is a string comprised of 6 or 7 fields separated by white space. Fields can contain any of the allowed values, along with various combinations of the allowed special characters for that field. The fields are as follows:
| Seconds | Minutes | Hours | Day of the month | Month | Day of the week | Year |
|---|---|---|---|---|---|---|
| 0-59 | 0-59 | 0-23 | 1-31 | 1-12 or JAN-DEC | 1-7 or SUN-SAT | empty, 1970-2099 |
The fields can also contain various combinations of the allowed special characters for that field. For example, the asterisk (*) special character can be used in all fields to represent all values within the field.
For a list of the allowed special characters in each field and for example expressions, see the Quartz Scheduler documentation
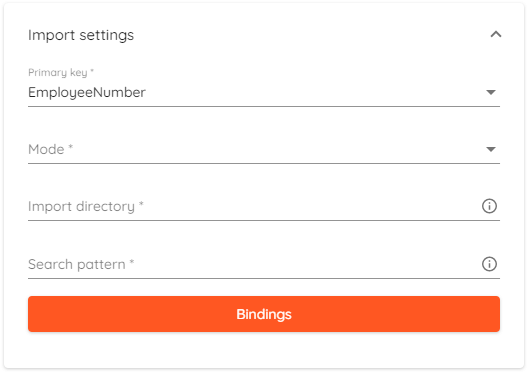
- Primary key - Required field for primary key used to identify unique users. First and Last name or Employee no. can be used.
- Mode - Defines import mode. Can be one of the following:
Overwrite,AppendorSynchronize. - Import directory - absolute path to directory import location.
- Search pattern -
Mode is a very important setting, proceed with caution.
| Mode | Description |
|---|---|
| Overwrite | Add new users and overwrite existing user data in CredoID. If user already exists, all data will be updated from import source. |
| Append | Add new users, update existing user details and append identifications, locations and access levels. Will not remove existing users if they are not present in the source. |
| Synchronize | Same as overwrite with exception that users are removed from CredoID if they do not exist in import source. |
¶ Export
Full user list together with credentials can be exported to CSV file. User export also can create ZIP archive and attach all the user profile pictures.
You can also export user list to a simple view PDF. The layout of PDF cannot be customized.
To export users click Export and select format.

User export CSV file is generated with up to 8 access levels per user and up to 16 locations per user.
¶ Reset APB
To reset APB status - select user(s) from a list and click Reset APB button.
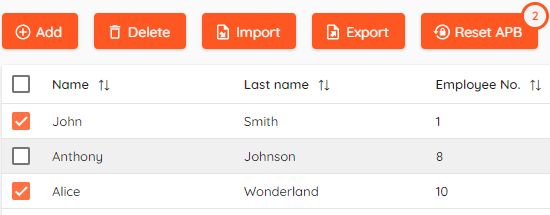
After successful reset you should see a message at the bottom of the page.

For users to be exempt from Anti-passback rules - select user from the list and then check Anti-passback exempt under profile picture in the main section.
