¶ The Interface

¶ Basics
There are 3 types of access areas that is currently supported - Anti-passback, Interlock and Occupancy.
¶ Anti-Passback
Anti-Passback (APB) is a feature that can be used to prevent users from passing their credential back for another user to borrow and to stop users entering an area by simply following or tailgating another user.

APB is supported only within single controller and its modules scope. I.e, HID Aero with up to 32 x100 door module can be used for single or more APB zones.
Anti-Passback is supported with HID Aero and Mercury controllers, partially supported with VertX controllers.
¶ Adding APB Area
To add new APB area click Add button and fill in the details in the menu on the right side of the screen.

Firstly, enter the name for APB area and then proceed to the next tab to configure access area doors.

Click on Add door and select which doors to assign to access area. Only doors with configured Entry and/or Exit readers will be shown in the selector field.
After selecting door you will be presented with anti-passback, interlock and occupancy choice. Leave anti-passback checked only to use APB.
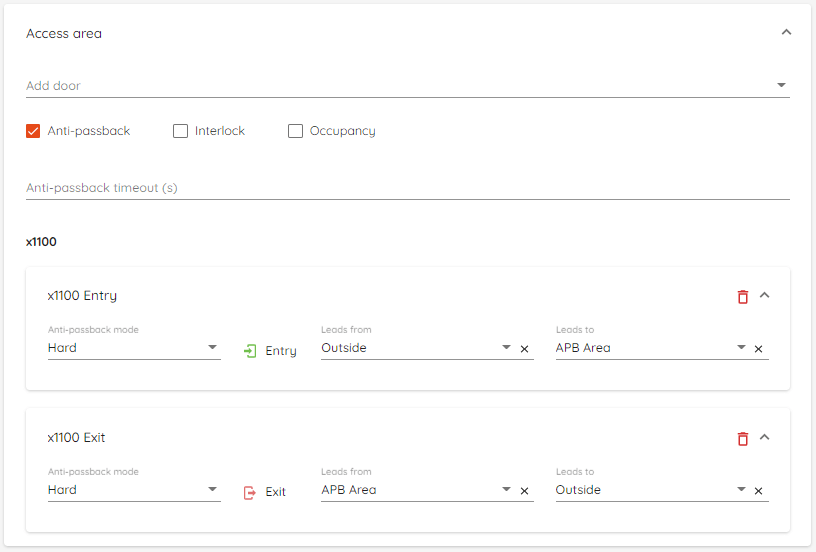
Proceed to select anti-passback mode, door direction and Leads from together with Leads to.
If necessary, enter anti-passback timeout.
- Anti-passback timeout - Time (in seconds) before APB state resets for user.
¶ Anti-passback modes:
- Hard - User is not allowed second entry. "Access denied" event with reason "Anti-passback violation" will be seen in the "Events" window.
- Soft - User is allowed second entry. "Access granted" event with reason "Anti-passback violation" will be seen in the "Events" window. User is allowed to access area.
- None - Door is excluded from APB area.
¶ Defining an area:
- Leads from - Allows to select current or previously created area. I.e, "Main entrance"
entrydoor can lead fromOutside. - Leads to - Allows to select current or previously created area. I.e, "Main entrance"
entrydoor can lead toAPB area.
Outside is a built-in entity which acts as non-APB zone. Usually users will be lead to "Outside" from APB area but you can also lead users to another APB area for tight security control.
Click Save when you're done and new area will be created.
Current APB state can be reset for each user individually or in bulk within Users.
For
anti-passbackto work door monitors must be present.
The feature is supported by hardware to ensure standalone operation in case of connection loss with CredoID. Therefore, APB zones should be designed within the scope and capacity of a single master controller and will be limited to the maximum supported door module count on said devices.
Modifying access levels will reset current APB state for all users.
¶ Interlock
Interlock controls the locking of two or more doors, so that if one door is open the remaining doors will refuse access.

Interlock is supported only within single controller and its modules scope.
Interlock mode supported with HID Aero and Mercury controllers.
¶ Adding interlock area
To add new interlock area click Add button and fill in the details in the menu on the right side of the screen.

Firstly, enter the name for Interlock area and then proceed to the next tab to configure access area doors.

Click on Add door and select which doors to assign to access area. Only doors with configured Entry and/or Exit readers will be shown in the selector field.
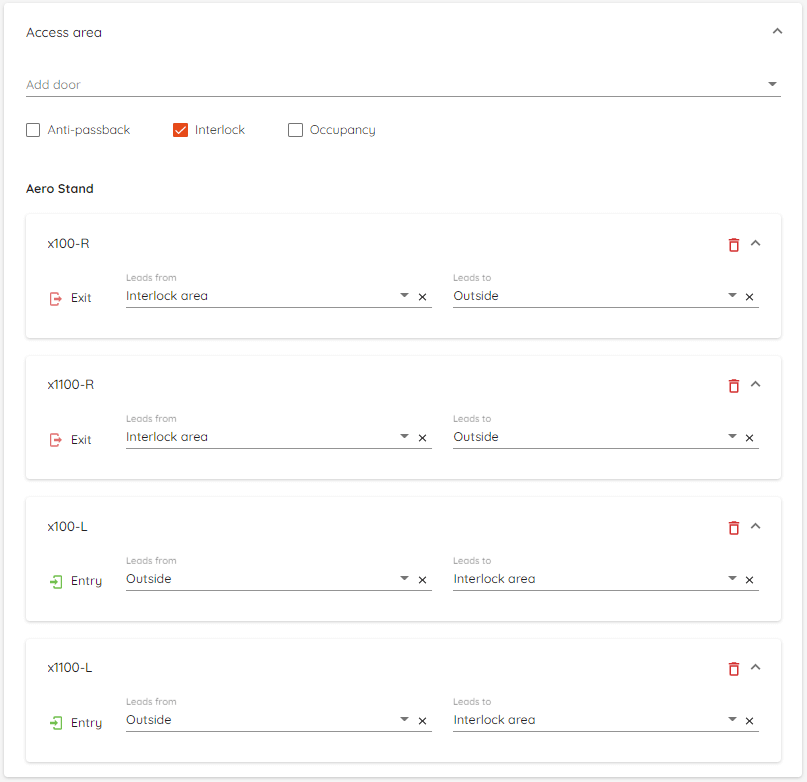
After selecting door you will be presented with anti-passback, interlock and occupancy choice. Leave interlock checked only to use interlock.
Proceed to select door direction and Leads from together with Leads to.
¶ Defining area:
- Leads from - Allows to select current or previously created area. I.e, "Main entrance"
entrydoor can lead fromOutside. - Leads to - Allows to select current or previously created area. I.e, "Main entrance"
entrydoor can lead toAPB area.
Click Save when you're done and new area will be created.
For
interlockto work door monitors must be present and all doors should be set to "Secure" (default) state.
¶ Occupancy
Occupancy is an additional feature for Anti-passback mode, it counts how many people are in the area.
Anti-passback mode, as well as door monitors, is required for Occupancy to work.
Access will be denied after reaching occupancy limit.

¶ Adding Occupancy area
First you need to configure this area to work as anti-passback. Please follow the guide on Adding APB Area.
To add new occupancy area click Add button and fill in the details in the menu on the right side of the screen.

Firstly, enter the name for occupancy area and then proceed to the next tab to configure access area doors.

Click on Add door and select which doors to assign to access area. Only doors with configured Entry and/or Exit readers will be shown in the selector field.
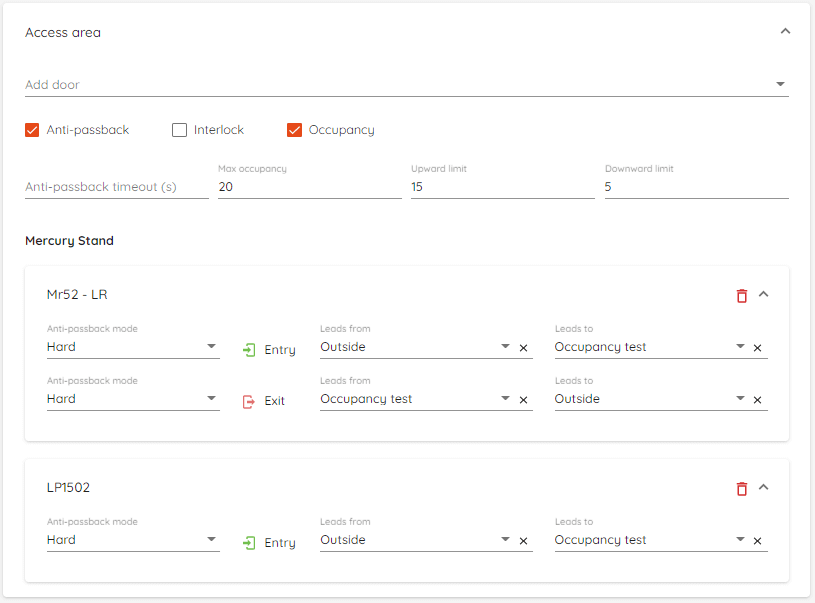
After selecting door you will be presented with anti-passback, interlock and occupancy choice. Leave occupancy checked to use occupancy mode. Anti-passback will be checked automatically as it is required for occupancy to work.
Proceed to select anti-passback mode, door direction and Leads from together with Leads to.
Outside is a built-in entity which acts as non-APB zone. Usually users will be lead to "Outside" from occupancy area.
After selecting Occupancy option you will be able to set Max occupancy, Upward limit and Downward limit.
¶ Occupancy states:
 - Starting state. This state is set when counter is 0.
 - State is set when counter is increasing and hits set Upward limit.
 - State is set when counter is decreasing and hits set Downward limit.
 - State is set when maximum set occupancy is reached.
Occupancy states will update automatically when certain limit is reached.
¶ Defining area:
- Leads from - Allows to select current or previously created area. I.e, "Main entrance"
entrydoor can lead fromOutside. - Leads to - Allows to select current or previously created area. I.e, "Main entrance"
entrydoor can lead toAPB area.
Click Save when you're done and new area will be created.
¶ Check/set current count
Current count can be checked and updated in the "Count" column. To check the current count you can either refresh the page or click this button -  .
.
Count can also be set manually simply by changing the count number.

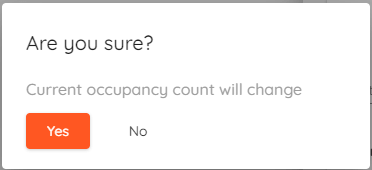
After changing the count number and pressing "Enter" key, prompt message will appear:

Click "Yes" and count will be changed.