Controller firmware update via API
Updating Mercury module firmware via CredoID API
- Open CredoID and log in using your credentials.
- Open devtools by pressing F12 and select “Network” tab. Using "Chrome" is recommended.
- Click on any request in the list, navigate to “Headers” tab, look for “Request Headers” section and find
“Authorization:”line. - Copy authorization header, everything after the word
bearer.
Example:

-
Go to Device related API calls if CredoID is hosted on http://localhost:8090 or change the link according to your domain.
-
Click “Authorize” and paste authorization header into the “Value” field and click “Authorize”.
-
Scroll down to “Mercury” section and look for
“POST /api/devices/mercury/{id}/send-command” -
Click “Try it out”`
-
Enter device ID in the
IDfield.
To find device ID - go back CredoID window, open devtoolsNetworktab, navigate to “Hardware → Devices” in CredoID, click on your device and you should see a request in network tab that is a number (that will be your device ID). -
Get your module identifier number. You can find it in CredoID “Hardware → Devices” by expanding your device info (Module identifier will be the number under ID column) or clicking on your device and going to “Device modules” in the side menu.
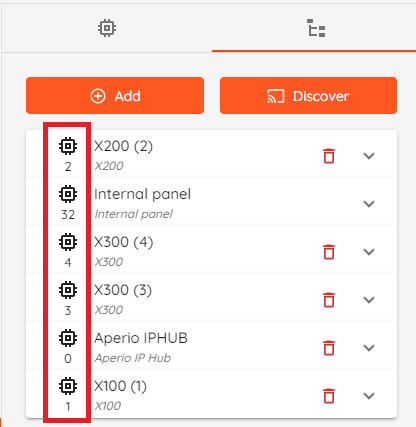
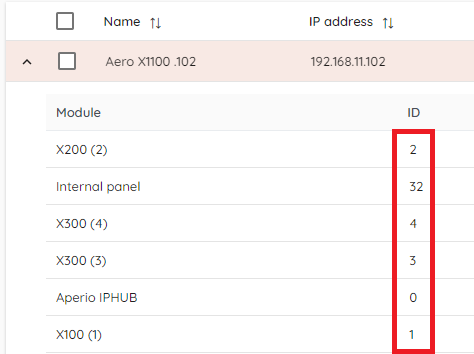
-
Create a folder in “C:\” and name it “Firmwares”, move your firmware file to that folder.
-
Back in Swagger API window, in the request body - instead of “string”, copy and paste
[
"328", "module identifier", "C:\Firmwares\firmware name.aax"
]
Change "module identifier" inside quotation marks with your module identifier from step 10 and exact firmware file name.
As example it could look like this:
[
"328", "2", "C:\Firmwares\mr52_s3b_3_22_4_enc.aax"
]
- Click “Execute”, if everything is correct you should get server response with code 200 : success. It may take a few minutes for module to update.